🖥️ Lesson 1.3: The Daz Studio Interface
Daz Studio's first impression can be overwhelming — panes everywhere, a big 3D window in the middle, and dozens of little controls. But the layout is logical once you know the four regions that matter. In this lesson we'll get you moving smoothly around the viewport, reading the Scene and Parameters panes, and arranging a workspace that fits how you work.
🎯 Learning Objectives
By the end of this lesson, you will be able to:
- Navigate the viewport confidently — orbit, pan, zoom, and frame your figure
- Read the Scene pane to select, rename, and understand the objects in your scene
- Use the Parameters pane to find and adjust any dialable property
- Recognize how the content panes feed items into your scene
- Rearrange tabs and panes, choose a built-in layout, and save your own workspace
Estimated Time: 50 minutes
Project: A comfortable, saved custom interface layout with the panes you'll use most — ready to load your first figure in Lesson 2.1.
In This Lesson
The Workspace at a Glance
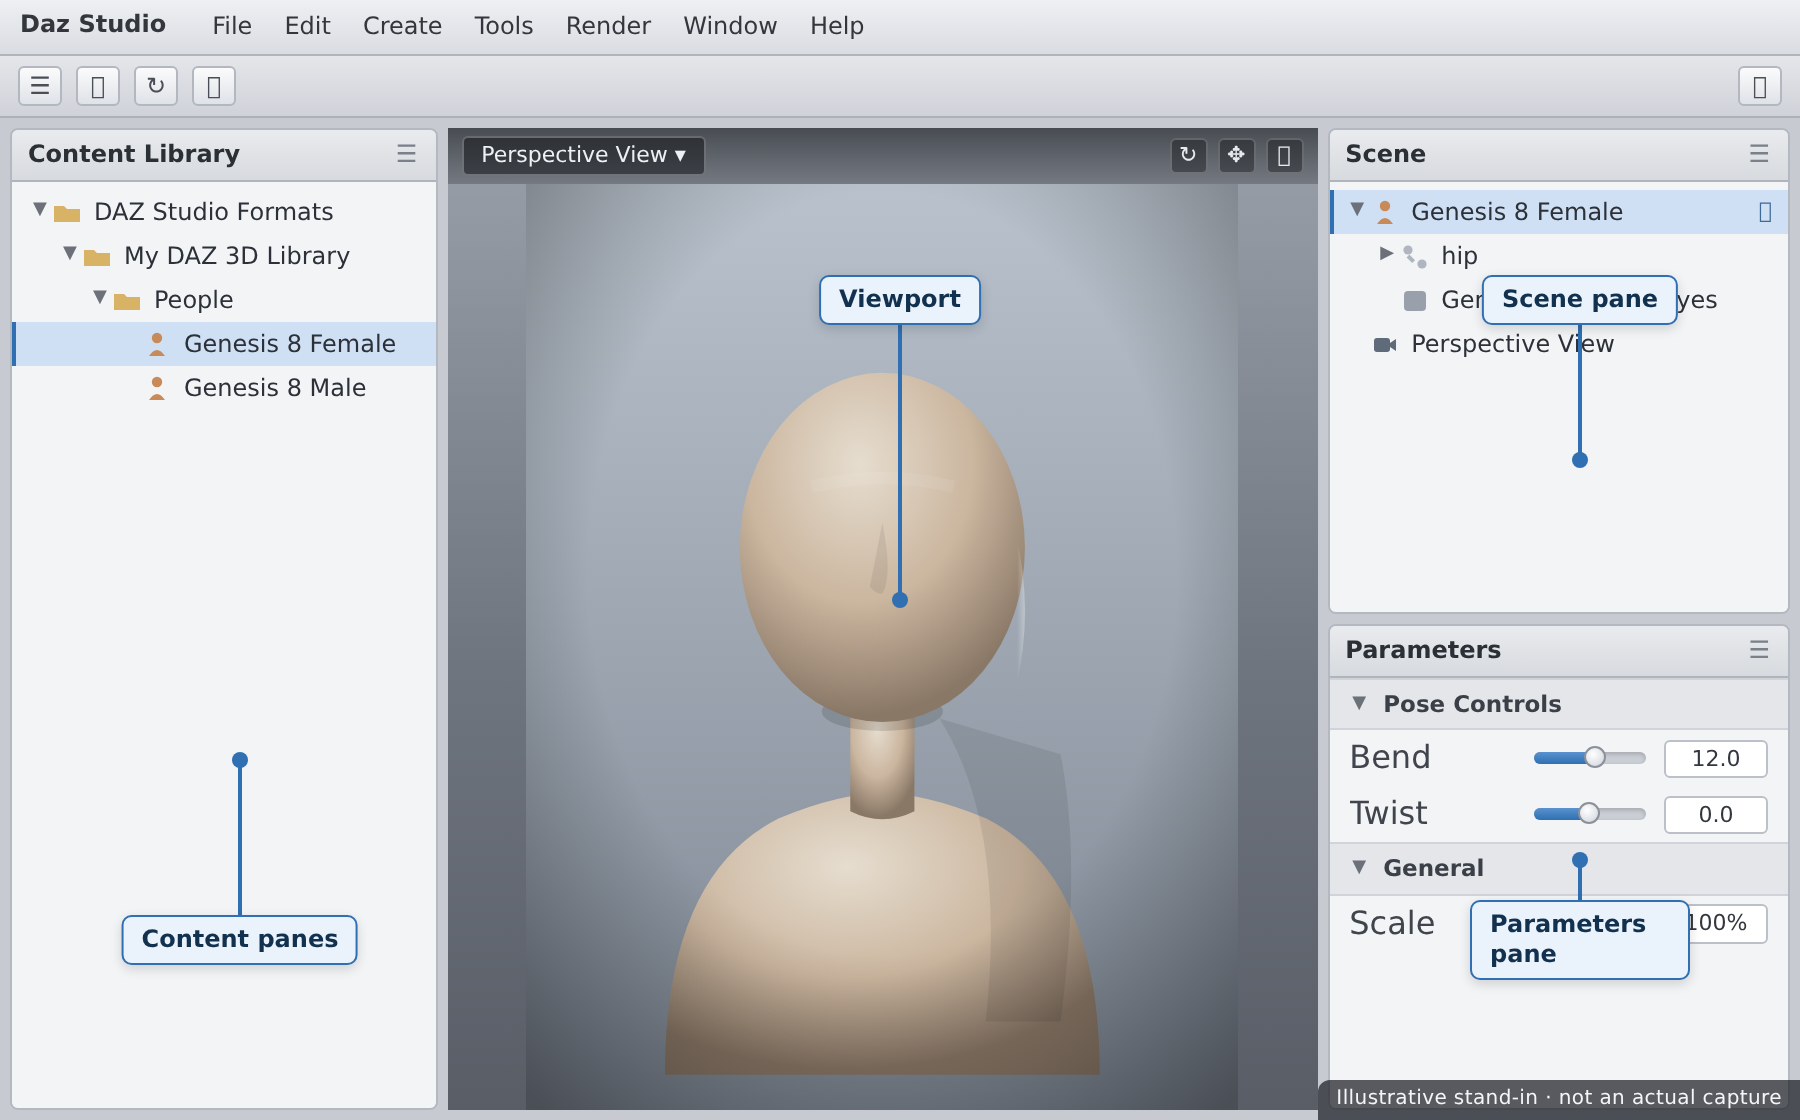
Open Daz Studio and it looks busy — but almost everything you'll touch falls into four regions. Learn these and the clutter turns into a map.
💡 The one-sentence version: The viewport in the center is your 3D stage; the content panes bring things onto that stage; the Scene pane lists what's on it; and the Parameters/tool panes change whatever is selected.
| Region | Where It Sits | What It Does |
|---|---|---|
| Viewport | Center — the large 3D window | Shows your scene in 3D; where you frame, pose, and preview |
| Content panes | Usually left or right | Smart Content & Content Library — where you find and load figures, clothing, poses |
| Scene pane | Usually top-right | A tree list of every object in the scene; your selection hub |
| Parameters & tool panes | Usually right or bottom | Parameters, Shaping, Surfaces, Posing — they edit whatever is selected |
The exact positions depend on the layout you're using (Daz ships several), but the roles never change. A workflow loop connects them: you find something in a content pane, it appears in the viewport and the Scene pane, you select it there, and you adjust it in Parameters. That loop is the heartbeat of Daz Studio.
Navigating the Viewport
The viewport is where you'll spend most of your time, so getting fluid with the camera pays off immediately. Daz gives you two ways to move: the little navigation cube/icons in the top-right corner of the viewport, and — faster once learned — mouse + modifier shortcuts.
The three core moves
| Move | What It Does | Default Mouse Control |
|---|---|---|
| Orbit | Rotate the camera around your subject | Drag with the left-drag on the orbit icon, or Alt + drag (varies by preset) |
| Pan | Slide the view left/right/up/down without rotating | Drag the pan (hand) icon, or the on-screen pan control |
| Zoom / Dolly | Move closer to or farther from the subject | Mouse wheel, or drag the zoom icon |
📖 Definition
Viewport navigation icons: the small cluster of controls (orbit, pan, zoom, and a nav cube) in the top-right corner of the 3D window. Dragging them moves the active camera. They're the reliable, mouse-only way to navigate — great while you're learning, before you memorize keyboard modifiers.
✅ The single most useful shortcut: Frame
Select an object and press F (or use View → Frame Selected) to snap the camera to nicely fill the view with it. Lost in space, zoomed off into the void, or can't find your figure? F brings it right back. Aim (A) similarly centers the camera on the selection without changing distance.
Cameras vs. the default view
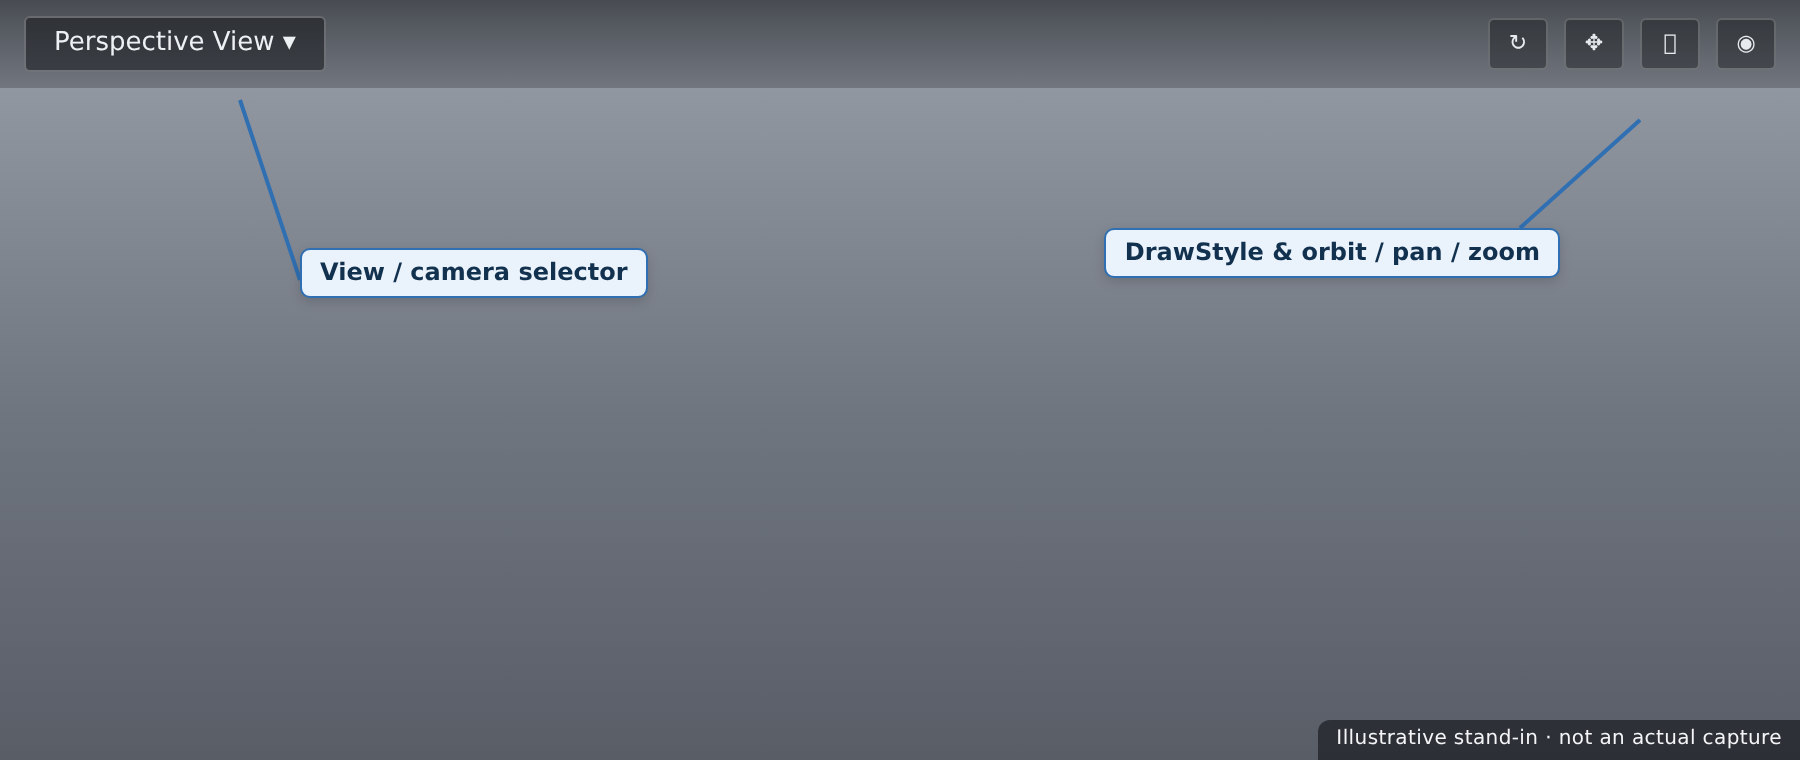
When you first open a scene you're looking through the Perspective View — a built-in default camera. You can also create real cameras (we'll do this properly in Module 3) and switch between them using the view selector dropdown at the top-left of the viewport. That dropdown also holds orthographic views — Front, Back, Left, Right, Top, Bottom — which are invaluable for lining things up precisely.
💡 DrawStyle — how the scene is shaded
The DrawStyle control (top-right of the viewport) changes how the scene is drawn while you work — Texture Shaded for a solid preview, Wire Shaded to see geometry, or Smooth Shaded. This only affects the working preview, not your final Iray render. Use a lighter DrawStyle if your viewport feels sluggish on a big scene.
⚠️ Important Note: If you orbit and your figure seems to swing wildly or the camera spins around the wrong point, it's usually because nothing is selected or a distant object is. Click your figure in the Scene pane, press F to frame it, and the camera will orbit around it sensibly again.
The Scene Pane
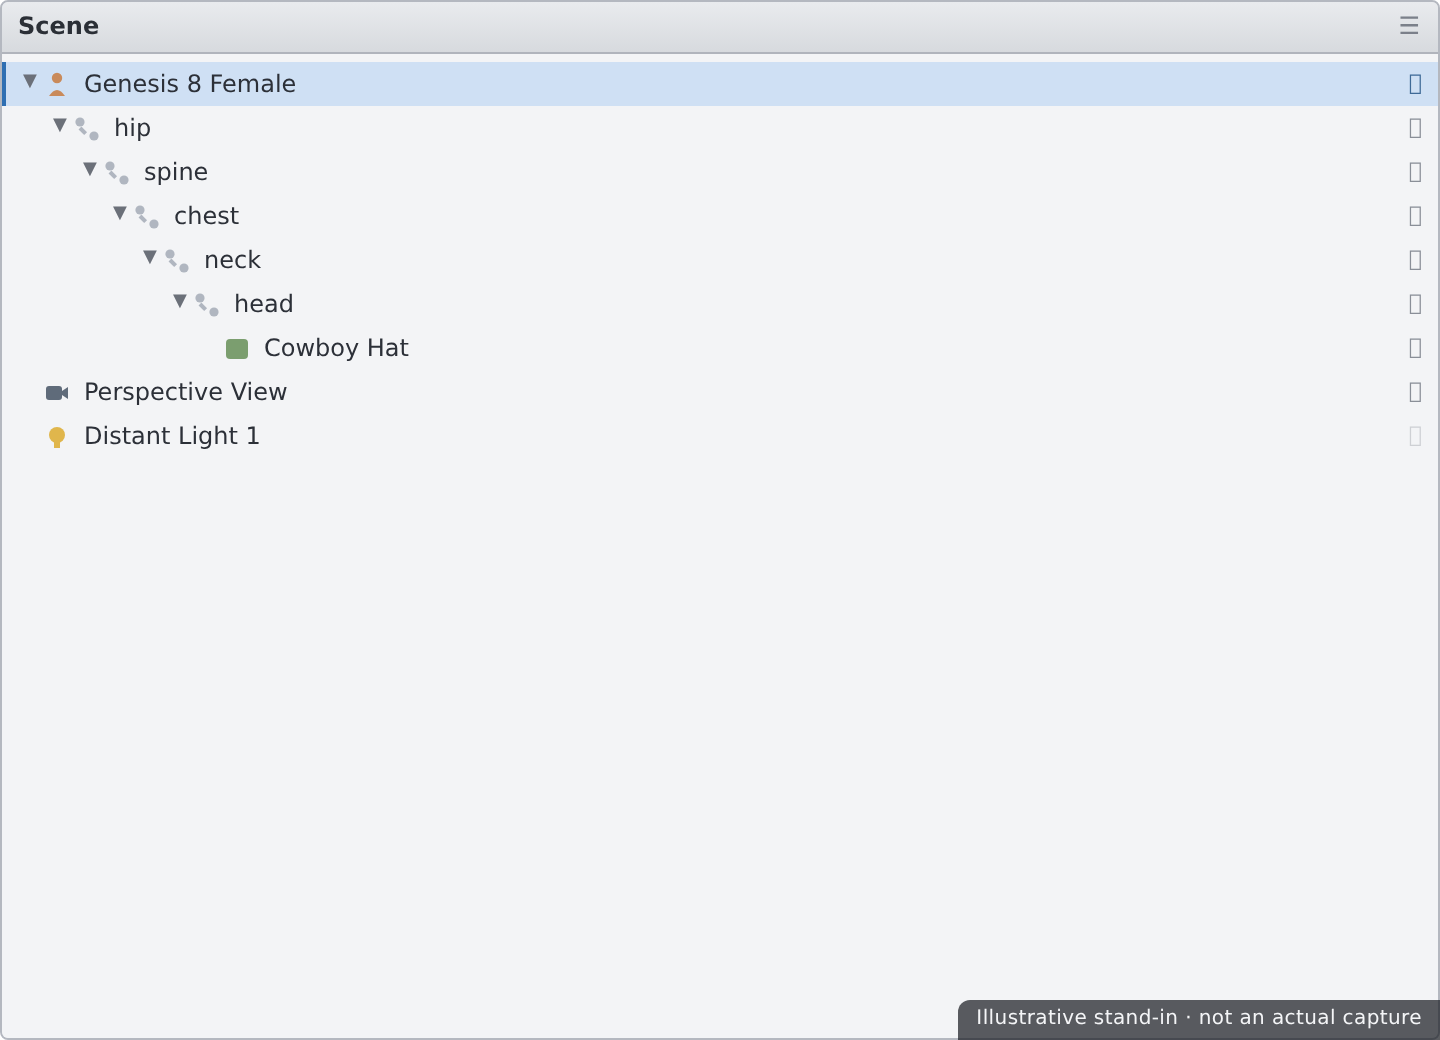
If the viewport shows you the scene, the Scene pane lists it. Every figure, prop, light, and camera appears here as a row in a tree. It's your primary way to select things precisely — far more reliable than clicking in a crowded 3D view.
What the tree tells you
- Hierarchy — indented rows show parent/child relationships. A hat parented to a head sits under the head figure; move the figure and the hat follows.
- Node type — small icons distinguish figures, props, bones, lights, and cameras at a glance.
- Expand triangles — click the arrow beside a figure to drill into its bones (great for selecting a single arm or finger to pose).
- Visibility — the eye toggle hides an object in the viewport without deleting it.
📖 Definition
Node: Daz's word for any single item in the Scene pane — a figure, a bone, a prop, a light, or a camera. Selecting a node is what tells every other pane (Parameters, Surfaces, Posing) what you want to edit. "Select the node first" is the golden rule of Daz.
✅ Pro Tip — rename as you go
Double-click a row to rename it. In a scene with three characters, Hero, Villain, and Extra beat Genesis 8 Female, Genesis 8 Female (2), and Genesis 8 Female (3) every time. Good names now save real confusion when scenes get busy.
⚠️ Important Note: Selecting in the Scene pane and selecting in the viewport are the same selection — they always stay in sync. When a lesson says "select the figure," clicking its top row in the Scene pane is the surest way to do it, especially once clothing and hair overlap it in 3D.
The Parameters Pane
Select a node, and the Parameters pane fills with every adjustable property for it — organized into groups down the left side and shown as dials (sliders) on the right. This is where posing values, transforms, and countless morphs actually live.
How it's organized
- Group list (left) — categories like General → Transforms (position, rotation, scale), Pose Controls, and figure-specific groups. Click a group to filter the dials.
- Dials (right) — each property is a slider with a number field. Drag the slider, type an exact value, or click the gear/menu on a dial for options like limits and reset.
- Search box — type a property name (e.g.
bend,scale) to jump straight to matching dials across all groups. Indispensable once figures have hundreds of parameters.
💡 Parameters vs. Shaping vs. Posing
You'll meet a few panes that all show dials. Parameters is the complete list. Shaping (Lesson 2.2) is a curated view of morph dials for changing a figure's body/face. Posing is a curated view of pose dials. They're friendly front-ends onto the same underlying properties you can always find in Parameters.
📖 Definition
Dial (parameter): a single adjustable value — a slider from, say, 0 to 100 — that drives something about the selected node: how far an elbow bends, how tall the figure is, how wide a nose sits. Most of what you "do" to a character in Daz is turning dials.
✅ Pro Tip — right-click a dial to reset
Nudged a value and want it back to default? Right-click the dial (or use its little menu) and choose Zero / Restore Default. To reset a whole figure's pose, select it and use Edit → Zero → Zero Figure Pose. Knowing how to get back to neutral removes the fear of experimenting.
⚠️ Important Note: If the Parameters pane looks empty or shows the "wrong" properties, check your selection first — the pane always reflects the currently selected node. Select a bone and you'll see that bone's rotations; select the whole figure and you'll see figure-level controls.
The Content Panes
You met these in Lesson 1.2 — here's how they fit into the interface. The two content panes are how items get into your scene in the first place.
| Pane | How You Use It Here |
|---|---|
| Smart Content | Select a figure, then browse compatible items — hair, clothing, poses — filtered to fit it. Double-click to load. |
| Content Library | Browse the raw folder tree (People → Genesis 8 …). Double-click any preset to load it, whether or not it has metadata. |
💡 Loading is usually a double-click
To bring something into the scene, double-click its icon in either content pane. Figures, poses, materials, and props all load this way. If a pose or material asks "apply to which figure?", it's using your current selection — another reminder that selection drives everything.
⚠️ Important Note: If a content pane is missing entirely, it's just closed — not gone. Reopen it from Window → Panes (Tabs) → Smart Content (or Content Library). We'll use that same menu next to rebuild any pane you want.
Tabs, Panes & Layouts
Here's the part that turns Daz from "cluttered" into "comfortable": the interface is fully rearrangeable, and you can save the arrangement. Every pane can be shown, hidden, docked into a tab group, or floated into its own window.
The building blocks
- Panes — individual tools (Scene, Parameters, Surfaces, Smart Content…). Open any from Window → Panes (Tabs).
- Tab groups — several panes stacked in one spot, each with a tab along the top. Click a tab to bring that pane forward.
- Docking — drag a pane's tab to a screen edge or into another group to re-dock it; drag it out to float it as a standalone window (handy on a second monitor).
Built-in layouts & styles
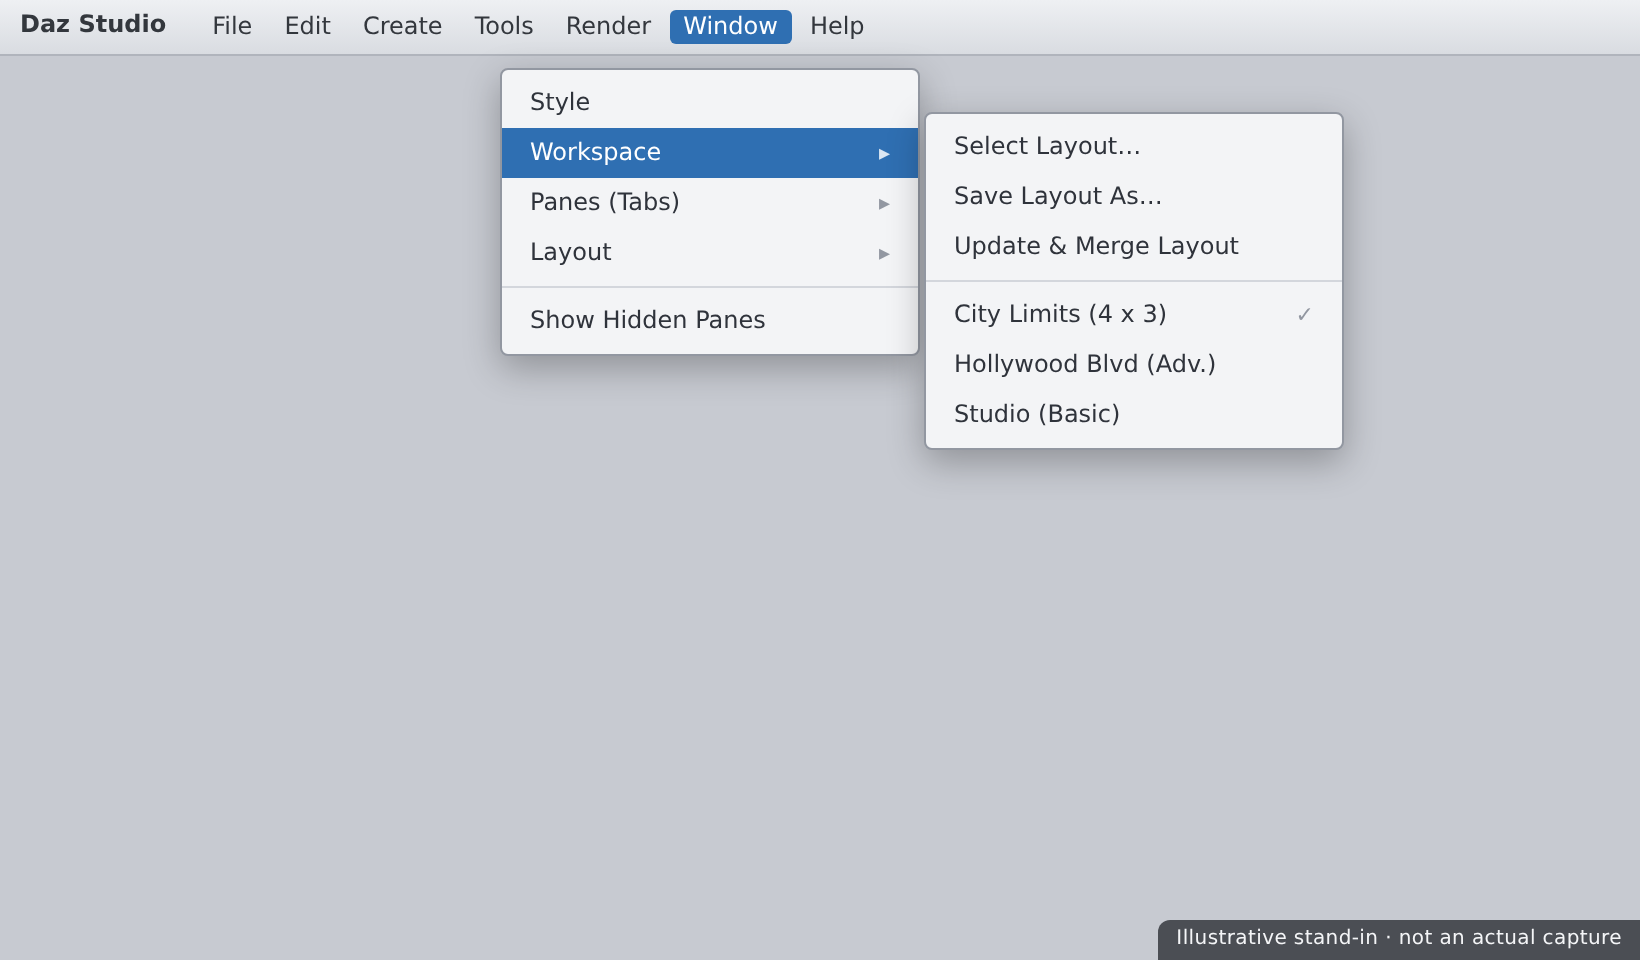
Daz ships with ready-made layouts under Window → Workspace → Select Layout. Two you'll hear about:
| Layout | Feel | Good For |
|---|---|---|
| City Limits | The modern default — panes docked around the viewport | Most users; what this course assumes |
| Hollywood Blvd | A more spread-out, panel-heavy classic | Users who like everything visible at once on a big screen |
You can also switch the Interface Style (colors/skin) under Window → Style — purely cosmetic, but a darker style is easier on the eyes for long sessions.
✅ Save your own layout
Once you've arranged panes the way you like, save it: Window → Workspace → Save Layout As…. Give it a name (e.g. My Daz Setup) and it joins the layout list. If you ever knock panes out of place, Window → Workspace → Select Layout → My Daz Setup restores everything in one click. This is the single best habit for a stress-free workspace.
📖 Definition
Layout: a saved snapshot of which panes are open and where they're docked. Switching layouts instantly rearranges the whole interface. Because it's just a saved arrangement, experimenting is risk-free — you can always reload a known-good layout.
Here's the mental model for customizing — from Daz's defaults to a workspace that's yours:
⚠️ Important Note: Closing a pane doesn't delete anything in your scene — it just hides the tool. Everything is reachable again from Window → Panes (Tabs). So feel free to close panes you're not using to reduce clutter; you can never "lose" your work this way.
Hands-on: Build Your Workspace
Let's make the interface yours. We'll load a quick object to have something to navigate around, practice the core moves, and then arrange and save a layout you'll use for the rest of the course.
🏋️ Exercise 1: Practice the Core Camera Moves
Objective: Get fluid with orbit, pan, zoom, and Frame.
Steps:
- From the Content Library, double-click any primitive or starter prop (or a Genesis figure if you've installed one) to put something in the viewport.
- Using the viewport's navigation icons, practice each move: orbit around the object, pan to slide it aside, and zoom in and out with the mouse wheel.
- Deliberately zoom far away until you "lose" the object, then select it in the Scene pane and press F to Frame it back into view.
- Open the view selector (top-left of the viewport) and switch to Front, then Top, then back to Perspective. Notice how orthographic views flatten the scene.
🏋️ Exercise 2: Select in Scene, Adjust in Parameters
Objective: Feel the select-then-edit loop that runs all of Daz.
Steps:
- In the Scene pane, click your object's top row to select it. Double-click the row and rename it to something memorable.
- Open the Parameters pane. Under General → Transforms, drag the Y Rotate dial and watch the object spin in the viewport.
- Use the Parameters search box to find
scale, then change the overall Scale dial and watch the size update live. - Right-click a dial you changed and choose Zero / Restore Default to snap it back. Confirm the object returns to neutral.
💡 Hint — my Parameters pane looks empty
The Parameters pane always mirrors your current selection. If it's blank, nothing (or the wrong node) is selected — click your object's row in the Scene pane and the dials will appear. Selection drives every editing pane in Daz.
🏋️ Exercise 3: Arrange & Save Your Layout
Objective: End with a saved workspace you'll reuse all course long.
Steps:
- Make sure these panes are open (add any missing ones from Window → Panes (Tabs)): Smart Content, Content Library, Scene, and Parameters.
- Drag their tabs to dock them where you like — content on one side, Scene and Parameters on the other. Close anything you don't recognize yet to cut clutter.
- Go to Window → Workspace → Save Layout As… and name it
My Daz Setup. - To prove it works: knock a pane out of place, then Window → Workspace → Select Layout → My Daz Setup to restore your saved arrangement instantly.
🎯 Quick Quiz
Question 1: You've zoomed away and can't find your figure in the viewport. What's the quickest way to get it back?
Question 2: The Parameters pane looks empty. What's the most likely reason?
Question 3: You've arranged panes exactly how you like them. How do you make sure you can get this arrangement back after moving things around?
Best Practices
✅ Do's
- Select in the Scene pane first — it's the most reliable way to target exactly the node you mean.
- Learn F (Frame Selected) early — it's your escape hatch from any lost-in-space viewport moment.
- Use the Parameters search box to find dials fast instead of scrolling hundreds of properties.
- Save a custom layout once you're comfortable, and reload it whenever the interface drifts.
❌ Don'ts
- Don't fight a spinning camera — if orbit feels wrong, select your figure and Frame it so the camera pivots around it.
- Don't panic when a pane vanishes — it's only closed. Reopen it from Window → Panes (Tabs).
- Don't leave everything named "Genesis 8 Female" — rename nodes in busy scenes so selection stays sane.
💡 Pro Tips
- Float a pane onto a second monitor by dragging its tab out of the main window — great for keeping Parameters huge while the viewport stays full-screen.
- Switch to a lighter DrawStyle (Wire or Smooth Shaded) if the viewport stutters on a heavy scene; it doesn't affect your render.
- Keep a spare copy of your saved layout name in mind — after a Daz update, reselecting your layout restores your comfortable setup in one click.
Summary
🎉 Key Takeaways
- The interface has four regions: the viewport (stage), the content panes (source), the Scene pane (list), and Parameters/tool panes (editor).
- Master three viewport moves — orbit, pan, zoom — and one shortcut, F to Frame Selected.
- The Scene pane is your selection hub; select the node first, because every editing pane reflects the current selection.
- The Parameters pane holds every dialable property of the selected node — use its search box and right-click to reset.
- Panes are fully rearrangeable; pick a layout, customize it, and Save Layout As… so you can restore your workspace in one click.
📚 Additional Resources
- The Daz Studio interface — official user guide
- The Scene pane — Daz documentation
- The Parameters pane — Daz documentation
🚀 What's Next?
You can now move around the workspace with confidence. That completes Module 1 — you understand what Daz is, you're installed with content, and your interface fits you. In Lesson 2.1 — Loading & Posing Genesis Figures, we finally put a character on that stage: loading a Genesis figure and bringing it to life with pose presets and manual posing.
🎉 Module 1 complete!
The interface used to look like chaos — now it's a map you can read. From here on it's pure creativity: figures, poses, morphs, light, and renders. Let's load your first character.